How to Loopback Your Computer's Audio for Recording

- Roland Boyden
- |
- Aug 17, 2020
- Roland has been at PhillyCAM as Access Facilitator since 2018 and has worked in public access in some form or other for the past 14 years.
Let’s talk loopback audio. This is the concept of virtualy routing the audio out from your computer directly to a destination without needing any cables or additional hardware. It can wind up being a kind of tricky concept, but it has myriad uses, especially in the days of social distancing. So let’s break it down.
First, why would you need this? Well, anytime you’re screensharing content over services like Zoom or Streamyard that includes audio, you’ll need loopback sound of some kind. Zoom has their own proprietary solution to this that auto-installs at the time that you install Zoom, but its actual quality isn’t fantastic. Streamyard also has a solution but it only works with Chrome tabs, so if you need to share sound from another program (like say Premiere for a tutorial!) you’re out of luck. That’s where installing a third party loopback application comes in handy.
Now, there are many out there. There’s even one that’s actually called "Loopback" but it costs quite a bit of money, so let’s ignore that one. Soundflower has been the gold standard for years, but it’s Mac only and if you try to install it these days you have to override Mac’s newest security guidelines just to trick it into installing. So let’s turn to a program that’s free, works on Macs and PCs and installs safely with just a few clicks. It’s called VB-Cable Virtual Audio and you can find the download page by clicking here.
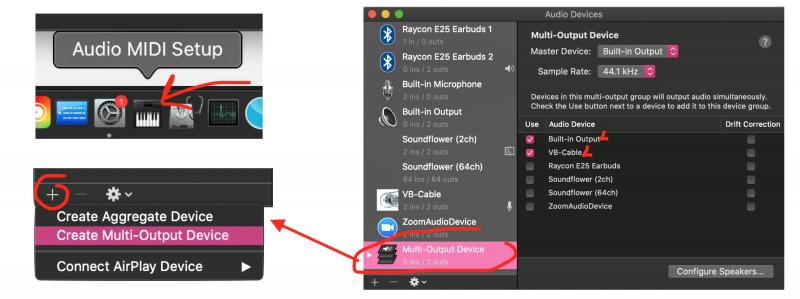
Once it’s installed you’ll see choices for VB-Cable in both your output and input devices list on your computer. From there you can set your system to play its audio out through the VB-Cable output and feed right back in to the VB-Cable input. Problem solved, right? Well there’s one issue with this. Now the sound isn’t coming out your speakers/headphones—it’s just going out that virtual cable to be recorded. So you can’t hear it yourself!. In Windows this is easy fix; you can simply activate two output devices at once in your sound settings. But on Mac they don’t make it that simple (c’mon Apple!). We’ll need to create a multi-output device (and here’s the link for how to do it).

Multi-output devices allow you to send sound to as many different locations at once as you want (wired headphones and bluetooth headphones for example). In this case we’re going to use it to create a multi-output device that goes to both our headphones and to VB-Cable so that we can still hear our own audio even if we’re routing it to a screenshare/recording. If we want to also double down on the input side—for instance, you want folks on Zoom to hear the computer audio and your microphone—you also need to create a new Aggregate Device (which is the term for multi-input devices) and check the boxes for both your mic and VB-Cable.

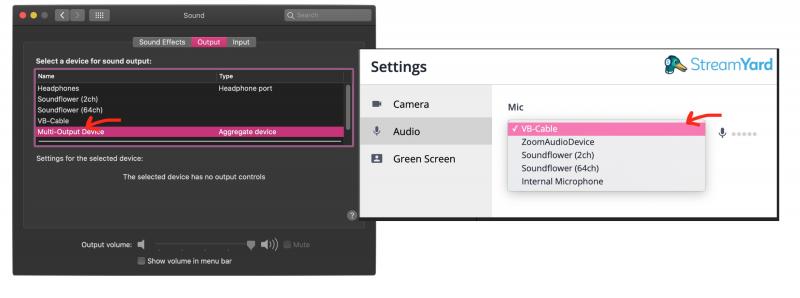
So that’s the bulk of it! There a few more issues to be aware of though. For one, you’re pretty much never going to want to set your Zoom or Streamyard speakers to that Multi-output device or to the VB-Cable directly. This is because you would wind up sending everyone on the call their own audio right back on a slight delay and that will really mess with them. Instead, leave Zoom/Streamyard feeding directly to your headphones and set either the system overall, or the specific application you’re sharing, to output to that Multi-output device. VLC Player is a program that you can set audio outputs for independently which is extremely useful for screensharing video clips into Streamyard without messing up the rest of your sound. We’ve got a whole tutorial on advanced screensharing for clip playback in Streamyard using VLC so be sure to check that out if you're going to use this audio loopback for Streamyard.
Well, there you go. Hope that was helpful. As always you can reach out to techservices@phillycam.org with additional questions about this process, or anything else tech related to your show at PhillyCAM.
