
PhillyCAM is Open: Read our updated COVID-19 Policy.
How to make Premiere Pro work on your home computer

- Roland Boyden
- |
- April 8, 2020
- Roland has been at PhillyCAM as Access Facilitator since 2018 and has worked in public access in some form or other for the past 14 years.
With so many of us stuck at home now, that means (at least for the time being) no trips to PhillyCAM's media lab to make use of those nice iMacs and Adobe Creative Cloud Suite. The good news is you can get up to two free months of the full Creative Cloud suite including Premiere Pro. Click here to check out this in-depth blog post about how to make that happen. But what about the actual computer to run Premiere Pro? Well, Adobe's list of hardware requirements may look a little daunting at first but luckily there are a few tricks you can use to get the most out of your system, even if it doesn't quite match up with what Adobe is saying you need.
First, you can find the full list of requirements from Adobe by clicking here and then finding the section for either Mac or Windows depending on what you're running at home. Next, check out the video tutorial above that I've put together with a few tricks to try and get the smoothest editing experience, even without top-of-the-line hardware.
In the video, I mention using a Proxy workflow. This is a workflow that allows even much older computers to edit new file formats and large resolutions by converting them all to smaller, easier-to-work-with files ahead of time. I've also made a tutorial for how to create proxies (though there are many good tutorials you can find online) so Click Here to watch that.
Another major issue that can jam up Premiere is not having enough space on either your boot drive (where all your applications etc live) or whatever external hard drive you're using to edit off of. Trying to make sure you maintain an overhead of around 20% space on both is a good rule of thumb to keep things from slowing down too much.
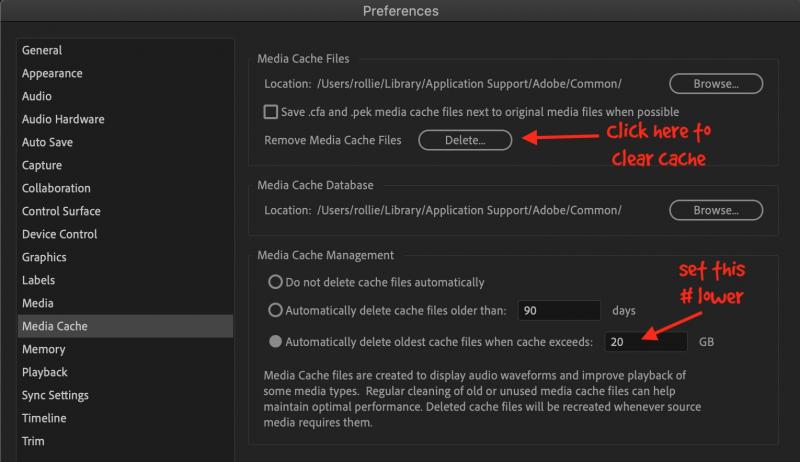
One issue with Premiere is that even if you're editing using an external drive, by default Premiere dumps a bunch of temporary files on your boot drive that can really build up over time if you're not careful (like to the tune of hundreds of GBs!). You can wipe these files by going to Preferences > Media Cache in Premiere and clicking 'Delete'. It's important to note that none of the files you're deleting are original files and they can always be made again so don't hesitate to click Delete regularly. The more often you do it, the less time it will take to perform. You can also set parameters at the bottom of this same window to help keep from having too many new files build-up, either by limiting how many GB it stores or for how many days it keeps them. If you want the full details on media cache you can click here to check out this really in-depth post about it.
So what's the end result here? Well, don't let the specs list deter you. We're all trying to make the best out of the situation we're in. Thanks to Adobe's free 7-day trial (regardless of whether you try to go for the free two months after that), you get a chance to try it out and see if you can make it work on your machine. It may not be perfect, but if it can get the job done that's all that a lot of us are looking for right now. If it doesn't seem like it's going to work, there are a number of alternatives like iMovie for Mac and Windows Photo on PC as well as a plethora of free/cheap mobile editing apps. Keep an eye on the blog for more to come on these topics!
That's all for now. Got more questions as you navigate this process? Hit us up at techservices@phillycam.org or log in to your PhillyCAM.org account to comment in the forum.